How to draw Santa Claus Step by Step
Dec 17 , 2018

Hi everybody and welcome to a new tutorial on the NIL-tech, this time entitled “How to draw Santa”.
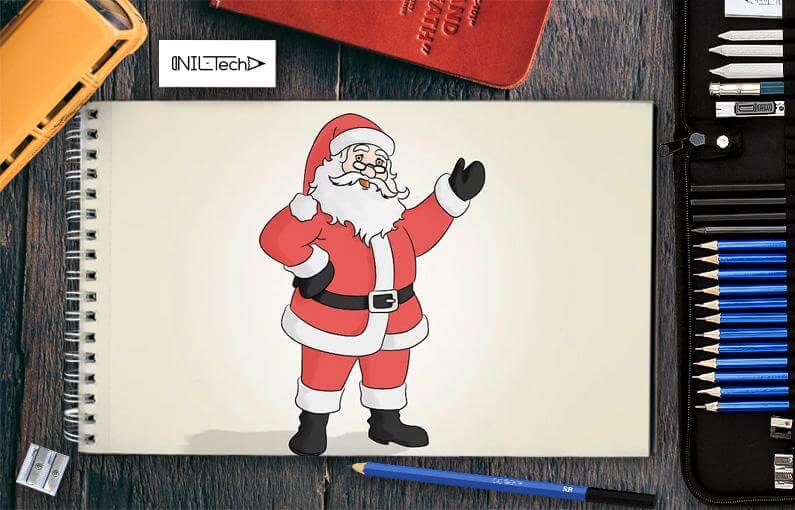
Need an image of Santa for a Christmas card or decoration? Drawing Santa is reasonably basic. Start by detailing his body with easy shapes. Add some detail to his jolly face and stubborn belly like a bowl full of jelly. Finish by coloring him in, and you have got a drawing of Santa best for cards and designs.
Let`s start to draw Santa Claus Step by step
In this tutorial, we used the next art supplies:
- H pencil
- B3 pencil
- B5 pencil
- H5 pencil
- Kneaded Eraser
- White Vinyl Eraser
- Blending Stump
STEPBYSTEP10
Part 1 Describing Santa’s Body

Step 1 Layout Santa’s head. Santa is around and jolly figure, numerous of the describes you will start with is done by drawing circles and ovals. Draw a circle toward the top of your paper. Produce another horizontal oval underneath for the neck and beard.
-
Draw your oval shape so that it intersects your very first circle. The top of the oval must have to do with midway up the circle for the head.
-
Include guidelines for the face. Draw a horizontal line down the center of your circle, and a horizontal line throughout. The horizontal line ought to be at the same level as the top of your oval. These lines will assist you space out the eyes and form the nose.
-
Include 2 more horizontal lines near the bottom of your circle for the mouth.
-
Utilize a pencil for the lays out. Draw gently so you can quickly erase any
Step 2 Draw two big circles for the body. The very first circle should converge the bottom oval on Santa’s head. The top of it must be at the exact same height as your bottom horizontal face line. Your 2nd circle must be larger than your very first one and intersect it. The top of this circle ought to reach the middle of your first body circle.
- The top of your 2 circles will be Santa’s chest. Keep it around and make it a little broader than his head.
- The bottom of your two circles is Santa’s stubborn belly. Make it about one and a half times larger than the circle for the chest.

Step 3 Add the arms and hands. To draw Santa’s arms, you wish to draw 2 fat ovals for each arm. The shoulders need to begin about where the lower oval for Santa’s face and his chest satisfy. His hands are two circles with 3 fat zig-zags for the fingers, and an upside-down “U” shape for the thumbs.
- He ought to look like a snowman at this moment.
- It’s okay if the ovals for the arms overlap the circle you drew for the chest. You’ll eventually remove your intersecting lines and make Santa look more three-dimensional.

Step 4 Draw Santa’s legs. Drawing Santa’s legs is really just like drawing his arms. Draw two shorter, fat ovals for each leg extending below his stomach. Then include two ovals for the feet.
- Santa is a little leading heavy, meaning that his upper body is bigger than his lower body. Aim to make certain that your ovals aren’t longer than the rest of his body.
- When drawing the legs, start the leading ovals, the thighs, at a larger point, closer to the outside of Santa’s tummy. Then angle the legs in just a little bit.
Part 2 How to draw Santa's Face

Step 1 Begin with the nose. Utilize the middle horizontal line as a guide point to start. The bottom of the nose must be at the exact same level as your middle horizontal line.
-
Draw around circle-like shape for the nose.
You do not want the circle to connect at the top, so leave it open. -
Then include the nostrils. On either side of the circular nose, draw a “C” shape. One forward “C” for Santa’s right nostril, and one in reverse “C” for his left nostril.

Step 2 Draw the mustache. Draw 2 “S” shaped lines extending horizontally from the ends of each nostril. Then draw the bottom of the mustache by adding a few zig-zags below your “S” formed curves.
-
To help you keep the mustache even, put a little dot under the nose in the center. Then when you draw the bottom of mustache, draw your zig-zags so the lines satisfy at the dot.
-
Then add 2 round lines beginning at the top of the nose on each side. Bring these lines down to meet near the edge of the mustache. These are Santa’s cheeks.

Step 3 Draw Santa’s eyes. Draw two large upside-down “U” shapes on top of the cheeks to form the eyes.
- If you ‘d rather have your Santa look a little less cartoony, you can draw 2 smaller sized circles above the cheeks for the eyes. These eyes will not be linked to Santa’s cheeks and will provide him a little bit of a more sensible look.
- Add the pupils to the eyes. Inside the eyes, draw 2 circles. One larger for the white part of the eye, and one smaller one for the students.
- If you have room and wish to, you can include smaller circles inside the students to make Santa’s eyes look glossy. Color in the students.

- If you do not have adequate room to make Santa’s eyebrows very bushy, you can draw 2 rounded rectangular shape shapes above his eyes.

- The more zig-zagged your lines are the more cartoony the beard will look. If you desire the beard to look more sensible, draw softer “S” shaped lines.
- Continue down and have the beard lines satisfy in the middle of Santa’s chest.

Step 6 How to draw a Santa hat. Start drawing Santa’s hat between his eyebrows. Unlike Santa’s eyebrows and mustache, you wish to draw smaller circle-like lines for the fuzzy white part of the hat. Think about it like drawing little clouds. Then follow your original summary for Santa’s head as you draw the top of his hat.
- Extend the line you draw for the bottom fuzzy part of the hat external around the head, and have it meet by his ears.
- As you draw a curved line up to form the top of the hat, you can extend the top of the hat above your original overview for Santa’s visit make it look proportional.
- On one side of his head, draw a curved line moving inward a bit. And instead of connecting it to the line of the hat from the other side, leave it unconnected.
- Then bring the other line over and past the other edge of the hat to add the stocking portion of it. Draw a little, puffy ball at the suggestion.

Step 7 Draw the mouth. Draw 2 “U” shapes under Santa’s mustache to provide Santa a big smile.
-
Then to make the mouth and beard look more reasonable, draw 2 zig-zagged lines extending from each idea of the mustache. Don’t link these lines to the outside of Santa’s beard, however. Leave a little space.
-
Now, draw the sides of Santa’s face. Connect the top part of the beard you simply drew, which extended from the mustache, with 2 wavy vertical lines on each side of Santa’s head. Bring these lines up to meet with the bottom of Santa’s hat.
-
If done correctly, Santa’s beard will twist around his face.
Part 3 Adding Santa’s Clothes and Coloring

Step 1 Go back over and describe Santa’s body. With the face and beard finished, you can now layout Santa’s body, and begin to add more detail.
- Draw over the external edges of your initial circles and ovals. You wish to fill out Santa’s body now, making him look more three-dimensional.
- Just draw the outer edges of your shapes.
- Eliminate any intersecting parts to provide your drawing weight.
- When finished, you will have a three-dimensional looking Santa that has a hat, but still no clothes.

- Start with Santa’s waistcoat. Draw the bottoms of the coat by drawing a curved line on the external side of each of Santa’s legs. The lines need to curve away from his legs until each line reaches the knee. Then draw 2 curved lines back up and connect these lines by the stomach button location. The bottoms of the waistcoat get a white fringe similar to his hat.
- Include the belt. The belt is a thick rectangle that curves slightly around Santa’s stomach. The bottom of the belt is where the 2 flaps of the waistcoat fulfill around the tummy button.
- Add a square buckle in the center and two belt loops, one on either side.
- Include a circular button or 2 in the center of the waistcoat.
- Below Santa’s waistcoat are his trousers which can be drawn with a few vertical zig-zag lines. He also has huge boots which increase to his shins.
- Lastly, draw 2 rectangle-shaped cuffs on his sleeves where his wrists are and make certain his hands are detailed.
Step 3 Color in your Santa. Include additional information before doing this if you like, such as making his beard longer or his belt buckle more elaborate. Eliminate any extraneous lines you may see. Then color him in.
- Santa’s hat, coat, pants, and boots are all red. His boots are slightly darker than the other red garments.
- The fringes on his hat and coat, including his cuffs, are white.
- You can make his gloves and belt brown, and even green if you like.
We really hope you enjoyed this tutorial! If you liked It, there are lots of ways you can make the United States a huge favor. Get the word out about our website to your loved ones, Link to this site or tutorial if you have a blog or site or bookmark it and share your favorite tutorial utilizing the network social tool you choose. That would be actually cool!
STEPBYSTEP10
Do not forget to leave a comment if you seem like it! We would like to speak with you!
 |
Drawing Pencil SetExcellent GIFT IDEA - Non-Toxic and safe, easily portable and made with quality top-notch materials. Basic and innovative drawing supplies come together in NIL Tech set as an exceptional replacement for old-fashioned pencil boxes. The main attraction at any occasion from your drawing enthusiast friends, sketchers, artists to your kids or students boosting their creative projects and enjoy their ear-to-ear smile! |


2 Comments
hi i realy like your drawings
hi i realy like your drawings